Finding the axes of a variable font
UPDATE 2: You may also be interested in Wakamai Fondue, a font tool by PixelAmbacht.
UPDATE: Firefox Developer Edition's Developer Tools has a robust font inspector. The feature will soon ship in main line Firefox. It's also available in Firefox Nightly. This post is still useful if you'd like to build some sort of automated tool for working with variable fonts. For most of us, Firefox is the easier option.
NOTE: If you only see a font with outlines and shadows, or don't see a font at all, it means that your browser doesn't yet support variable font features.
One area of CSS that I explored while writing the second edition of CSS Master is variable fonts. More properly called OpenType Variations, they're the Next Big Thing in web design.
Variable fonts are an extension to the OpenType specification, which guides the creation of fonts that work well across multiple operating systems. With OpenType Variations, font designers can expose particular features of their fonts for manipulation with graphic design software or CSS.
Why is this a big deal? Variable fonts use a single file to support multiple weights or styles. For designers, that means more control (within some limits) over how a font appears on a web page. For web users, that means fewer font files and bytes to download.
The problem with variable fonts
OpenType defines five axis tags that are standard across variable fonts.
italor italicopszor optical sizeslntor the degree of slant for oblique textwdthwhich has an effect similar to thefont-stretchpropertywghtwhich has an effect similar to thefont-weightproperty
Variable fonts may support all or none of these, and font designers can choose to define and expose more. That's where it becomes tricky. As I wrote in CSS Master, (second edition):
Which values we can modify, and the boundaries of those values, depends on the font file itself. You’ll need to consult the documentation for each font, if available.
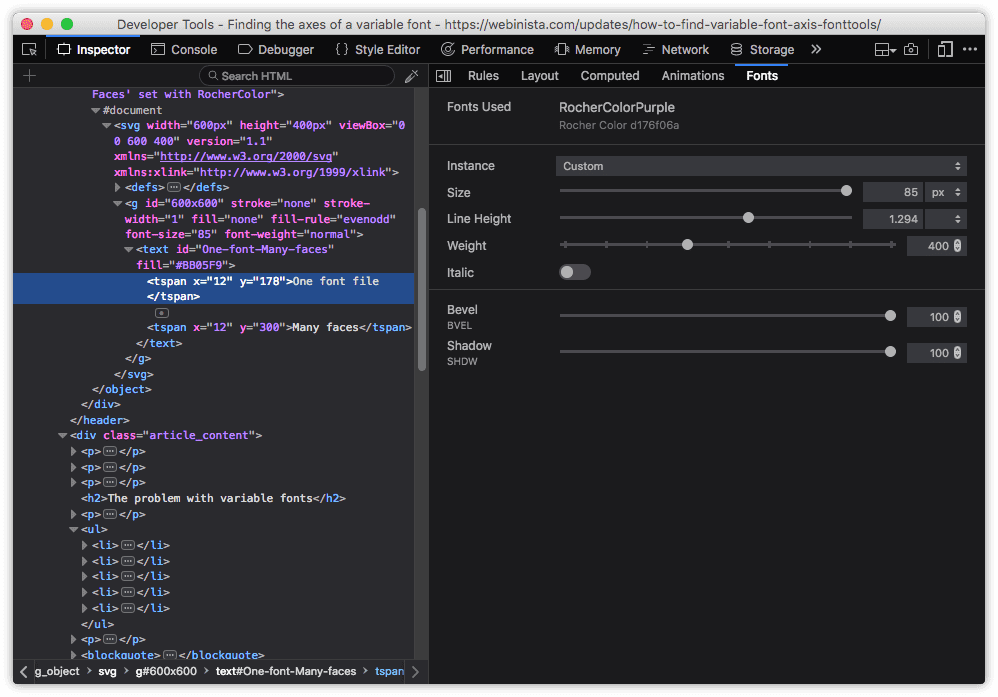
That if available part is the rub. Sometimes these axes are well-documented. Often they are not. FontView, for example, reveals the human-friendly names of axes, but not the associated axis tags. We can use FontView to learn that Decovar includes axes named Worm Terminal and Stripes, or that Rocher Color exposes bevel, and shadow axes. But we can't use it to find the axis names themselves.
For that, we need to enlist the help of ttx, part of the fonttools Python package.
Installing fonttools
Before you can install fonttools, make sure that your computer has the prerequisites installed.
- Python
(minimum version 2.7.9 or 3.4)3.7 or later pip3, the Python package installer for version 3 of the language. It ships with Pythonversions 2.7.9, 3.4 and later.
Install fonttools using pip. Type the following command in a terminal window.
pip3 install fonttools
macOS users who have Homebrew installed can install the Homebrew fonttools package instead.
brew install fonttools
Both will install the fonttools package, which is really a collection of other packages. The one we're concerned with here is ttx. ttx converts binary font files to TTX XML format, and back again. It basically turns all of the font's glyph and table data into a consumable XML file that we can extract data from or use to manipulate the font.
Extracting the data
Once you have fonttools installed, the next step is to extract the variable data. This data is stored in the fvar table, and only variable fonts contain it. To extract it, use the following command.
ttx -t fvar /path/to/font.file
Don't forget to replace /path/to/font.file with the path to the file you'd like to inspect. Once it's done, you'll have a new file with a *.ttx extension. If your font file name is FancySerifs.woff, you'll see a FancySerifs.ttx in the same directory.
Understanding the TTX file
TTX is a font-specific variant of XML. You can open it with any text editor. Once you do, you'll see XML that looks a bit like the example below. This is the full fvar table data for Amstelvar Roman, an experimental variable font released under an SIL Open Font License.
<?xml version="1.0" encoding="UTF-8"?>
<ttFont sfntVersion="\x00\x01\x00\x00" ttLibVersion="3.29">
  <fvar>
    <!-- Optical Size -->
    <Axis>
      <AxisTag>opsz</AxisTag>
      <Flags>0x0</Flags>
      <MinValue>8.0</MinValue>
      <DefaultValue>12.0</DefaultValue>
      <MaxValue>144.0</MaxValue>
      <AxisNameID>256</AxisNameID>
    </Axis>

    <!-- Weight -->
    <Axis>
      <AxisTag>wght</AxisTag>
      <Flags>0x0</Flags>
      <MinValue>1.0</MinValue>
      <DefaultValue>400.0</DefaultValue>
      <MaxValue>1000.0</MaxValue>
      <AxisNameID>257</AxisNameID>
    </Axis>

    <!-- Width -->
    <Axis>
      <AxisTag>wdth</AxisTag>
      <Flags>0x0</Flags>
      <MinValue>60.0</MinValue>
      <DefaultValue>100.0</DefaultValue>
      <MaxValue>200.0</MaxValue>
      <AxisNameID>258</AxisNameID>
    </Axis>

    <!-- Grade -->
    <Axis>
      <AxisTag>GRAD</AxisTag>
      <Flags>0x0</Flags>
      <MinValue>-60.0</MinValue>
      <DefaultValue>0.0</DefaultValue>
      <MaxValue>60.0</MaxValue>
      <AxisNameID>259</AxisNameID>
    </Axis>

    <!-- x opaque -->
    <Axis>
      <AxisTag>XOPQ</AxisTag>
      <Flags>0x0</Flags>
      <MinValue>18.0</MinValue>
      <DefaultValue>88.0</DefaultValue>
      <MaxValue>287.0</MaxValue>
      <AxisNameID>260</AxisNameID>
    </Axis>

    <!-- x transparent -->
    <Axis>
      <AxisTag>XTRA</AxisTag>
      <Flags>0x0</Flags>
      <MinValue>57.0</MinValue>
      <DefaultValue>402.0</DefaultValue>
      <MaxValue>892.0</MaxValue>
      <AxisNameID>261</AxisNameID>
    </Axis>

    <!-- y opaque -->
    <Axis>
      <AxisTag>YOPQ</AxisTag>
      <Flags>0x0</Flags>
      <MinValue>8.0</MinValue>
      <DefaultValue>62.0</DefaultValue>
      <MaxValue>102.0</MaxValue>
      <AxisNameID>262</AxisNameID>
    </Axis>

    <!-- y transparent lowercase -->
    <Axis>
      <AxisTag>YTLC</AxisTag>
      <Flags>0x0</Flags>
      <MinValue>420.0</MinValue>
      <DefaultValue>500.0</DefaultValue>
      <MaxValue>570.0</MaxValue>
      <AxisNameID>263</AxisNameID>
    </Axis>

    <!-- y transparent uppercase -->
    <Axis>
      <AxisTag>YTUC</AxisTag>
      <Flags>0x0</Flags>
      <MinValue>500.0</MinValue>
      <DefaultValue>750.0</DefaultValue>
      <MaxValue>1000.0</MaxValue>
      <AxisNameID>264</AxisNameID>
    </Axis>

    <!-- y transparent figure height -->
    <Axis>
      <AxisTag>YTFG</AxisTag>
      <Flags>0x0</Flags>
      <MinValue>425.0</MinValue>
      <DefaultValue>750.0</DefaultValue>
      <MaxValue>1000.0</MaxValue>
      <AxisNameID>265</AxisNameID>
    </Axis>

    <!-- y transparent lowercase descender -->
    <Axis>
      <AxisTag>YTDE</AxisTag>
      <Flags>0x0</Flags>
      <MinValue>-500.0</MinValue>
      <DefaultValue>-240.0</DefaultValue>
      <MaxValue>-138.0</MaxValue>
      <AxisNameID>266</AxisNameID>
    </Axis>

    <!-- y transparent lowercase ascender -->
    <Axis>
      <AxisTag>YTAS</AxisTag>
      <Flags>0x0</Flags>
      <MinValue>500.0</MinValue>
      <DefaultValue>750.0</DefaultValue>
      <MaxValue>1000.0</MaxValue>
      <AxisNameID>267</AxisNameID>
    </Axis>

    <!-- serif rise -->
    <Axis>
      <AxisTag>YTSE</AxisTag>
      <Flags>0x0</Flags>
      <MinValue>0.0</MinValue>
      <DefaultValue>18.0</DefaultValue>
      <MaxValue>50.0</MaxValue>
      <AxisNameID>268</AxisNameID>
    </Axis>

    <!-- ParaWeight -->
    <Axis>
      <AxisTag>PWHT</AxisTag>
      <Flags>0x0</Flags>
      <MinValue>18.0</MinValue>
      <DefaultValue>88.0</DefaultValue>
      <MaxValue>287.0</MaxValue>
      <AxisNameID>269</AxisNameID>
    </Axis>

    <!-- ParaWidth -->
    <Axis>
      <AxisTag>PWTH</AxisTag>
      <Flags>0x0</Flags>
      <MinValue>75.0</MinValue>
      <DefaultValue>490.0</DefaultValue>
      <MaxValue>1179.0</MaxValue>
      <AxisNameID>270</AxisNameID>
    </Axis>
  </fvar>
</ttFont>
Each of these <Axis> blocks is a variable that we can modify using font-variation-settings. <AxisTag> contains the axis name, while <MinValue>, <MaxValue>, and <DefaultValue> contain the minimum, maximum, and default values for that axis. Preceeding each <Axis> block is a comment that contains a more readable axis name.
Using variable font axes
So how do you use these axes? First, include it in your web page using @font-face.
@font-face {
    font-family: 'FontFamilyName';
    src: url('FontFamilyName-Variable.woff2') format('woff2-variations'),
         url('FontFamilyName.woff2') format('woff2'),
         url('FontFamilyName.woff') format('woff');
    font-weight: 1 1000;
}
Here we've set a font-family descriptor and provided the path to a WOFF2 file with variable font support. We've also included non-variable WOFF2 and WOFF files as fall backs. Although support for variable fonts and WOFF2 compression is pretty robust, not every web user upgrades their browser as soon as it's released.
Keep in mind that TrueType and OpenType formats, and WOFF compressed files an also support variable font features. If you're using a TrueType or OpenType variable font, use truetype-variations or opentype-variations as the format hint. For WOFF files, use woff-variations. (Note: the syntax for this will change soon.)
We've also done something a little different here with the font-weight descriptor. Instead of using a single value such as bold or 300, we've included a weight range. This tells the browser to use this file for font weights that fall within the range. The valid font-weight range, according to the CSS Fonts 4 specification, is values greater than or equal to 1, and less than or equal to 1000.
Now we can use the font-variation-settings property, defined in the CSS Fonts Module Level 4 specification, to set the value of one or more of the axes extracted from the fvar table.
h1 {
    font-family: 'FontFamilyName', serif;
    font-variation-settings: "wght" 650, "YTSE" 40, "wdth" 100;
}
Each axis must be enclosed in quotes. Multiple axis values should be separated with a comma. UPPER CASE axis names indicate that they are specific to the font.
If you just want to adjust a simple axis such as the weight or width of a font, use font-weight or font-stretch instead. Reserve font-variation-settings for those variable fonts that make extensive use of custom axes.
Animating variable fonts
One last thing: it's possible to animate the font-variation-settings property. View the CSS file for the SVG image that accompanies this post for an example. The text in the image was not converted to outlines. Instead it uses @font-face and a custom color version of Rocher Color. Rocher Color exposes two properties — bevel and shadow — for manipulation with CSS, and both are animated here.
Get CSS Master, third edition
 Did you learn something from this blog post? You might like the third edition of CSS Master. It contains several nuggets of CSS joy like this one.